My Recent Make Up Lesson with Kandigloss
13:28:00
Happy Friday everyone!!
This was quite a hectic week for me both in work and for the blog. What better way to start your working week back then a make up lesson on Day one :)
After work on Monday, I headed from Naas to Citywest to meet the beautiful Michelle. As with my previous lesson, Michelle from Kandigloss http://kandigloss.wordpress.com/ is another beauty blogger and MUA. We got in touch through twitter and Michelle very kindly offered me a full lesson for half the price so just €35 and let me tell you, it was money well spent.
In preparation for the lesson, we had discussed what I'd like to do, so I had suggested we create a dark smokey look, using my own products including my new Urban Decay Naked 3 palette. Another aspect to this lesson which I felt would help me loads is to do a half and half lesson. Basically ladies, if you are going for a lesson and really want to learn.... Ask your MUA to create the look on half your face and then you have to recreate it on the other half. This is a great learning technique as your MUA can point you in the right direction but also it becomes more clear in your memory when you have actually created the look yourself. It can take more time but if you have a great MUA like Michelle, they will be very patient and give you load of help and encouragement
Although I could buy make up all day and night... January is not the best month to be investing in loads of new make up so using what I have was a great plan. This will also make it an awful lot easier for me to recreate the look, but it is important for me to say, you don't have to own these exact products to achieve this look, similar colours with the same technique will work perfectly.
As I had sent out the question of budget beauty products, I will be creating a beautiful look using more main stream products soon so keep an eye out.
Michelle, very kindly, as part of our lesson offered to type out all our makeup details so credit to Michelle for this, makes blogging the lesson so much easier for me. As I said ladies, money well spent, Michelle does this as part of all her lessons so you never have to worry about remembering it all.
We began with my eyes, again girls this is a great idea if you are worried about fall off from products, or in general it's much easier to only fix your eyes as opposed to your whole face.
Smoky eyes using the Urban Decay Naked 3 palette (Michelle's notes)

Eyeshadow:
·
From the Urban Decay Naked 3
Palette I took “Trick” and applied it all over the first 2/3rd‘s of
the lid with a flat shader brush (MAC 239 works good for this)
·
Using the same brush I added
“Factory” to the outer third of the lid and blended with a fluffy blending
brush.
·
I then took the colour “Limit”
and using a fluffy blending brush I applied it lightly in the crease using
windscreen wiper motions back and forth in the crease to blend.
·
I also took the darker colour
“Darkside” and using a stiffer domed brush from Nima (a 239 would also work
though if you just “place” the colour in the V) and worked it into the outer V
of the eye blending into the crease with the fluffy brush and building a couple
of times with the colour.
·
I also used a touch of
“Blackheart” though the outer V to darken slightly.
·
I blended the edges as much as
possible and softened it with some more “Limit” on a fluffy brush over the
edges. Softening edges with my fingers also if necessary
·
I highlighted the browbone with
“Strange”
·
I then added a little more of
“Trick” to the inner lid and went over the centre lid with a dab of “Dust” on a
MAC 239.
·
Moving onto the under eye area,
I used a MAC 219 pencil brush & ran “Trick” on the under part of the eye
1/3rd in and used “Darkside” on the outer 2/3rd’s smudging
well.

Liner
& Mascara:
·
Using an Inglot synthetic
angled liner brush, I applied Maybelline Black Gel Liner to the upper lashline
in a thick-ish line, winging slightly on the edge by just pressing the angle
brush into the outer corner.
·
I lined the lower rim of the
eye with UD 24/7 black pencil and smudged it slightly into the lashline also
with a pencil brush (this is optional, depending on how dark you want it to
look on the bottom.
·
I then applied mascara and
moved onto the face.
Face:
·
I applied Emma’s own foundation
which was YSL Touché Éclat using a Bland Canvas F20 stippling brush.
·
Using MAC Select Cover Up
concealer which is a creamy consistency an perfect for undereyes, I applied
this under the eye area using a Real
Techniques domed crease brush and I blended down in a V to the cheeks and up
onto the cheekbone as well as near the inner part of the bridge of the nose.
·
I also used it to conceal any
blemishes using the same concealer.
·
In order to set the undereye
area and ensure there was no creasing or settling in lines, I patted over the
under eye area with fingers evening out the product and quickly took an Inglot
4SS blending Brush and using a Catrice face mattifying powder, I swept it over
the undereye area to set the concealer and ensure it didn’t crease or budge.
·
I also swept it lightly all
over the face to set the foundation.

Contour,
Blush & Highlighting:
·
Using Emma’s Contour palette
and a small blush/contour brush from Crownbrush, I highlighted under her
cheekbones & on the temples as well as along the Jawline and along both
sides of the nose (using a smaller fluffy blending brush)
·
I then blended any harsh lines
with soft fluffy Inglot powder brush.
·
Taking my small blush brush I
applied NARS “Orgasm” blush to the apples of Emma’s cheeks and blended back to
the temples with the Inglot powder brush.
·
Using the same small blush
brush I took some MAC Mineralize powder in “Lightscape” as a highlighter along
the top of the cheekbones, down the centre of the nose and on the cupids bow.

Brows:
·
Using Emma’s HD Brow Palette, I
applied the dark brown shade to her brows with an angle brush.
Lips:
·
I lined Emma’s lips with
Rimmel’s East-end Snob and applied her pink MAC Lipstick (forget the name
sorry!) I then went over with MAC Nymphette lipgloss
·
Finally, I applied glamourous
false lashes and Emma was good to go!


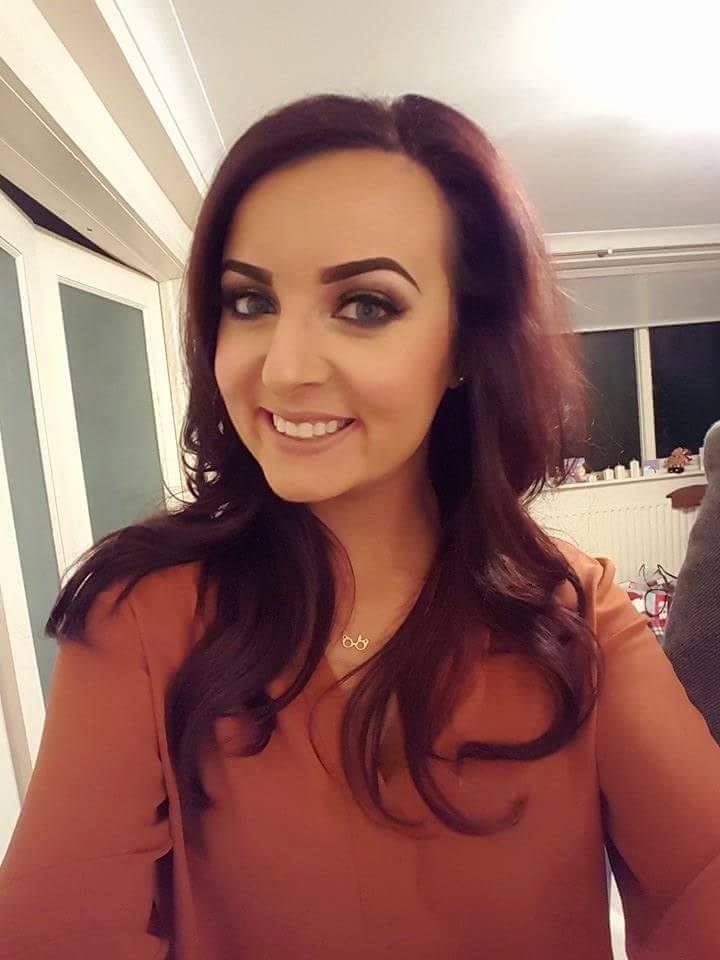
As you can see I looked amazing so thank you so much to Michelle for her patience and hard work. Also on the night, Michelle used her fab camera to capture the look, I then went home and went pose mad as Michelle also showed me the 'beauty shot' mode on my Samsung S4, I nearly choked that I had not seen this before, I looked like a doll so be aware all my pics will now be in beauty shot mode haha!!
I have to say as a lesson, it was one of the best half and half's I have done. We took our time, we chatted loads, I was very relaxed and comfortable and I do feel it's possible for me to recreate this look using the notes Michelle has provided.


Thanks so much to Michelle from Kandigloss it was brilliant be sure to check her out on:
Facebook: http://www.facebook.com/kandiglossMU
Twitter: @kandigloss
Instagram: @kandigloss
Any questions you guys know where I am and don't forget my Cleanse Off Mitt comp ends this Sunday get onto Facebook for your chance to win!! https://www.facebook.com/emmajcsheehanblog?ref=hl

Emma x


2 comments
lovely post hun, and such a great idea! I might look into visiting a makeup artist and use products I already own. Will definitely be having a nosey through some more of your posts :)
ReplyDeletefaceitamy.blogspot.co.uk
Hey Amy thanks so much, it's the best way to learn. There's no need to rush out all the time and buy new things, better to learn how to be brilliant with what you already have in my opinion anyway :) Hope the posts help xx
ReplyDelete